HOW TO: Refresh Your WordPress Site’s Facebook Preview Image

That's the wrong image, Facebook.

If you work with or are targeting a demographic that’s active on Facebook, you may have come across a frustrating issue when you (or anyone else) shares your WordPress-based website—the preview image isn’t what you expect… or want!

Never fear, my friend. I’ve got your back. If you’re a current client (or you’d like to be a client), just hit me up, and I’ll get it fixed for you ASAP.

Not a client or prefer to DIY? No problem. Got your back there too!

About OpenGraph Images

Facebook (and other social media platforms) usually display the first image available on the page or post as the Preview image unless another image is specified. If you have no suitable images on your page, there may be no preview at all… or maybe just your logo, which (if it isn’t sized properly) isn’t ideal.

The images Facebook prefers to use as preview images are called OpenGraph images or OG images and are part of the OpenGraph system, which allows your website to be displayed as a “rich object”, rather than just a simple text link when it’s shared.

OG images can be designated in the meta tags of your webpage like this:


					<meta property="og:image" content="https://limeiscreative.com/wp-content/uploads/2020/06/FB-og-image_2020.jpg" />


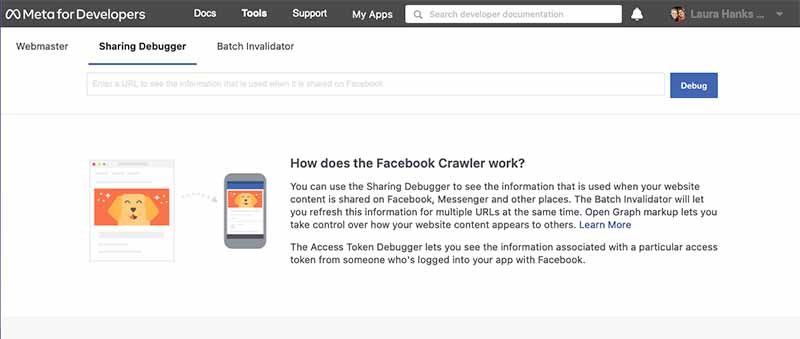
Long story short, OpenGraph takes this:

https://www.limeiscreative.com

and turns it into:

By including the correct OpenGraph tags in the meta description of your site, you can dictate what shows up in that preview.

NOTE: For this quick tutorial, I’m going to use “Page” to talk about your site, but this process works for both Pages (hierarchical sorting and structure) and Posts (date-based sorting and structure). Additionally, I’m going to talk about IMAGES only, not the other OpenGraph elements (which are just as important).

Log In

Log into your WordPress website using your Admin credentials.

Set Your OG Image

There are a few ways to go from here.

OPTION A – Featured Image + Plugin

The easiest is to add the desired image as your page’s Featured Image and install the free OG – Better Share plugin. Keep in mind, though, that some WordPress themes display the Featured Image as part of the published page. In that case, you’ll have to decide if this is the best choice for your site.

If not, skip to 2B below.

  1. Navigate to the page that you want to update with a new or updated OG image. Click “Edit Page” in the admin bar at the top of the page to open it inside the WordPress system.
  2. Add your Featured Image. Not sure how? Learn How to Add a Featured Image to a Page or Post
  3. Then, from your WordPress Dashboard, click Plugins, then Add New. Using the “Search Plugins…” feature, search for and select OG – Better Share on Social Media.
  4. Install and activate the plugin. And… Done! Every featured image on your site is now the OG image for that page. Head down to Step 3.

OPTION B – Full(ish) SEO Plugin

Install a free plugin that allows to you set the OpenGraph data and image for each page of your site. We like the free version of Yoast WordPress SEO. It’s free, and includes other super useful SEO feature. Yoast also offers a paid Pro version.

  1. From your WordPress Dashboard, click Plugins, then Add New. Using the “Search Plugins…” feature, search for and select Yoast WordPress SEO
  2. Install and activate the plugin.
  3. Follow their instructions for adding your OG images and other OG data. Then continue on to Step 3 below.

Tell Facebook to Check Again

After you have the correct image added to your site and it’s set as the OG image, you’ll need to tell Facebook to look for the new image. Here’s how to do that:

  1. Open the Facebook Sharing Debugger for developers: https://developers.facebook.com/tools/debug
  2. Paste your page’s URL into the “Enter a URL to see the information…” box and click Debug.
Meta Facebook Sharing Debugger
  1. If the image and other details that load are correct, skip to Step 4. You’re done!
  2. Otherwise… click the gray “Scrape Again” button, and wait for the crawler to hit your site again for updated data.

Success!

No success? Overwhelmed or lost? Lucky for you, you don’t have to figure it out—you can hire an expert (or, you know, a team of experts with over 35 years of combined experience) to handle all the complicated stuff for you.

That doesn’t mean you don’t know what you’re doing; it means that you value your own time and know when to call in the pros.

About the Author


Laura Kline

Laura Kline is a graphic designer and communications specialist. She has a master's degree in media design and over 18 years of experience working with agencies, businesses, and nonprofit organizations of all sizes.

Leave a Reply

Your email address will not be published. Required fields are marked *